Don’t get stranded on the water without fuel! A broken boat gauge is pesky. Here are instructions on how to troubleshoot and fix an unresponsive fuel gauge.
Why is my boat fuel gauge not working? There are five items that will cause a boat fuel gauge to not work. The fuel gauge itself, the power to the gauge, the fuel sender, the ground to the system, or the fuel sending wire. These systems will need to be tested individually to fix the gauge.
Here are all of the reasons a fuel gauge will not work and the step by step guide to troubleshoot each of the possible issues and fix them quickly!
My Boat’s Fuel Gauge Is Broken/Unresponsive!
If your boat’s fuel gauge is not working, the one thing you’ll want to avoid is being stranded on the water without any fuel in your tank.
When it comes to avoiding this issue, we need to make sure that the fuel gauge is operating properly.
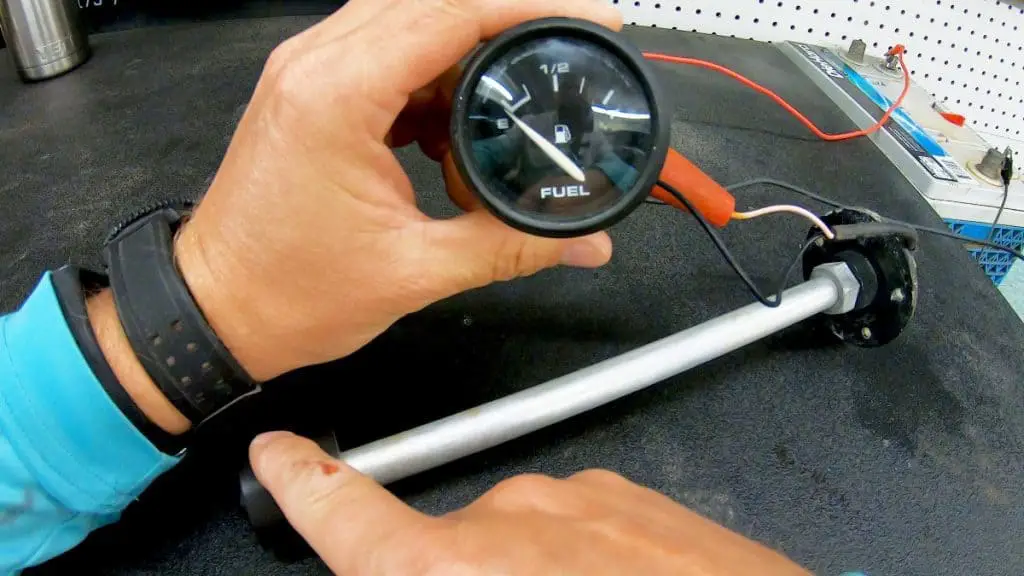
Typically, there are five main components in your run-of-the-mill analog fuel gauge system:
- The fuel gauge itself
- The fuel sender located inside the fuel tank
- The power wire to the gauge
- The ground
- The sending wire that runs from the sender to the gauge
Boat Fuel Gauge Stuck On Empty or Stuck On Full?
To be honest, these boat fuel gauges are pretty simple. They connect to only three wires that run to the gauge.
These wires consist of the “power” or 12 volts wire. And this comes in from the key ON power wire from the key switch.
This way, whenever you turn the key ON, the gauge receives power and turns on the fuel gauge system.
These are usually a yellow or purple wire (depending on what brand engine you have on your boat).
Make sure that wire has battery voltage on it going to the gauge. If there is an issue with the power going to the gauge. It will constantly read full or empty depending on what is going on.
Once that’s done, you’ll have a ground cable that will run from the gauge to the boat’s grounding system.

NOTE: It is extremely important that this ground is connected to the same ground that is going to the fuel sender.
In the event these two grounds are not hooked up together for whatever reason, the system will not operate. This means you won’t know how much fuel is in your boat!
Did someone say running out of gas? Yikes!
The last wire that runs to the gauge is the sending wire that originates from the fuel sender. This wire is normally (or should be) pink in most vessels.
This informs the gauge of the position of the fuel sender.
The only missing component left on these gauges is usually the light. The light just uses jumper wires coming from the power wire to the light wire.
Then, a jumper that runs from the ground to the light.
If the gauge isn’t getting power, it will stick on empty. And if the gauge shorts out, it will stick on full! By testing these two “wire issues”, you will find out whether you need to replace the gauge or not.
How To Test A Boat Fuel Tank Sending Unit
We just covered the components of an average fuel gauge. Remember, these are fairly simple systems that have been proven to work for many decades.
Things operate a little differently when it comes to the fuel sender located in the tank.
These gadgets operate by using resistance in order to send information back to the fuel gauge.
The fuel gauge takes that reading and moves the needle across the gauge, indicating how much fuel you have.
Generally, these senders will range from ~240-250 ohms down to about ~30-35 ohms.
This means that when the float is at the bottom of the sender, it will have the most amount of resistance. In turn, it will read somewhere around ~245 ohms on your meter.
If the float is at the top of the sender, it will read somewhere around ~30 ohms.
In some cases, depending on what part of the world you live in. These readings and measurements could be swapped one way or the other!
But we can test the sender by simply hooking it up to a voltage meter and running the float up and down the sender. If the resistance changes, the sender works.

Make sure to keep an eye on the readings. The sender should display a smooth transition of numbers.
When it comes to senders, there are a couple of different styles. There are also a ton of different brands and fuel sender manufacturers.
Personally, we try to stick with WEMA or KUS brand fuel senders.
There are generally two types of senders. There is the “pipe-like” type where the sender has a float that moves up and down the rod.
The second most common style of sender is the type where the float is on an extended metal or plastic rod.
This rod turns the mechanism at the top of the sender and sends the resistance reading to the fuel gauge.
We’d recommend using the straight up and down style in your permanent boat fuel tanks if possible. As these are the kind you are going to most likely find in your boat’s fuel tank.
In larger tanks you’ll usually find the straight senders.
When it comes to smaller tanks that don’t have a lot of distance to move, you will find the metal rod style. Think of portable fuel tanks.
How Do You Test A Fuel Gauge On A Boat?
It isn’t uncommon for any of these components to fail in this system. The good news is, troubleshooting the system is actually pretty easy.
You can start by finding the fuel sender. You can do this by opening the fuel tank access which is usually in the middle of the boat.
Then, disconnect the pink and black wires from the sender and (with the key in the ON position), touch the two wires together.
If the gauge, the power, the ground and the signal wire are all functioning properly, the gauge should spike to FULL.
This also tells us that the issues we are experiencing have something to do with the sender.
If the gauge doesn’t spike, however, we need to run some quick tests.
The first test we will run is checking for battery voltage at the gauge using our meter.
We are looking for 12 volts, or something close to that, from the power wire to the ground on the back of the gauge.
If we don’t have voltage here at the gauge, we can check the ground side quickly by touching the closest ground with our negative meter lead. Remember to leave the positive lead on the gauge.
If you see voltage show up on the meter, now you know that the ground is bad.
If you don’t see voltage come back using the known good ground, and do the following…
Follow the power wire down to where it draws power from and confirm that it isn’t broken, has a blown fuse or isn’t getting power at all.
Once you get power back to the gauge, the next test is to rule out the sending unit wires by taking a piece of wire and connecting it straight to ground at the battery. Then, bring it to where the fuel sender is.
Again, touch the sending wire and the ground wire that you brought and watch for the gauge to spike in order to cross off the ground being the issue.
If the gauge spikes, you know that the ground is broken somewhere.
You can also perform this test by using your meter.
You can do so by ohming out the ground wire to see if it has high resistance. This means the wire is broken or corroded somewhere.
You should perform this exact same test for the signal wire. Going from the gauge and connecting it to the ground to see if the gauge spikes, ruling out the sending wire.
If everything checks out there, now we know the fuel sender is not operating properly and we can pull the sender out of the tank. And test it by using our meter and watching the resistance to see if there are any breaks or bad readings.
This leaves us with simply needing to replace the sender (or run new wires). You might also have to replace the gauge, depending on what you find to be the issue.
How Do I Fix The Fuel Gauge On My Boat If It’s Digital?
This same analog system functions the same way when it is hooked up to different manufacture digital gauges. It only requires a couple of small tweaks to it.
When it comes to different manufactures…
The basic difference is that instead of having power, ground and a gauge in the system, the system will only use the sender, the ground going to it, and the pink sending wire that will go from the sender to the white or pink wire that is on the gauge. Depending on what brand you have.
Yamaha, Honda, and Suzuki all have either pink or white wires where the sender will hook up.
These can all be tested the same way by disconnecting & touching the sending wire and ground together while keeping an eye on the gauge.
When it comes to Mercury, the system operates differently. Instead of the pink wire going to the gauge, it runs to the engine. You can NOT touch the sending wire and ground together to test the system.
If it doesn’t see the resistance from the sender, it will just read zero. Even when you ground it out.

This Mercury system requires the ground to be connected to the same ground the engine is on, which shouldn’t be a problem. Keeping in mind boats can be wired up a little funny.
As long as the ground is good, the big difference is that the sending wire attaches to the engine by what is called a “boat harness”.
This harness has a pink and black wire that attaches to the sender.
It also has a blue and black wire that can attach and read a second tank separately as well!
This harness connects to the engine’s wire harness and feeds the information to the computer on the engine to interpret it.
This results in the tank fuel level reflecting on the gauge, letting you know how much fuel you have left.
To troubleshoot this system, you need to pull the sender out and test it for resistance and operation.
You can also troubleshoot by getting another sender and hooking it up to your ground & sending wire. Then, watch the gauge as you move the float.
If nothing happens, simply follow the wire like we normally did on the analog system and figure out where the break or bad connection is!
These systems are becoming more common as more boats are sending the engine and boat system information to the GPS’ instead of analog gauges.
You are now officially ahead of the curve as you know how fuel gauges work, how to troubleshoot them, and how to fix them!
Check Us Out!
Check out our YouTube channel where we show you step-by-step videos on all things boating!
Now that you know about fuel gauges, check out these other helpful articles packed full of information to help you with your boat!
If you’ve got any questions or comments, let us know by subscribing to our YouTube Channel!
And if you would like to support us to continue bringing you great content, please click the link below to Amazon where we get a commission from anything you are already going to buy!
Click Here To Amazon!
And you can also donate by clicking the donate button here or on the right hand of the screen!
It really helps us out and we thank you so much for your support!
Thanks for reading and we look forward to reading your responses and comments.