If you spend enough time in the world of boating. Eventually, you will come across the dreaded fuel smell! After going through the boat and checking everything, we get to the point where we are almost %100 sure that the fuel tank is bad! Now it’s time to pressure test the boat fuel tank, but how?
A Complete Guide On How To Pressure Test A Boat Fuel Tank:
- Get a pair of Hose Pinch Pliers, An Inflatable Pipe Plug, and a low-pressure air pressure gauge that can be tee’ed into a 3/8″ fuel hose with a schrader valve.
- Locate the fuel fill hose and the vent hose access ports. As well as the fuel pick up access.
- Install the inflatable pipe plug into the fuel fill port and pump up to shut off the fuel fill hose.
- Pinch off the fuel tank vent hose.
- Remove the fuel hose from the pickup tube fitting and install the low-pressure air pressure gauge and hose.
- Pump up the tank with air but Do Not Exceed 3 lbs of pressure!
- Spray the sender and all fittings and ports on the tank with soapy water and look for air bubbles.
Here is a very simple and easy to follow way to pressure tank a permanent boat fuel tank at home without expensive tools!
Acquire “special tools!”
In order to pressure test the tank, we need to make sure we close off all of the locations where air could get out. As well as have a way to put air into the tank!
There are some really cheap things that we need to have to do this. The first of which is a pair of pliers that are called hose pinch pliers.
These basically close on a hose and they stay closed pinching the hose shut until you release them!
Then we need a plumbing tool that you can get at your local hardware store, which is called an inflatable pipe plug. This tool basically fits into a pipe, and you can apply pressure to it to expand the plug and close off the pipe.
The last thing that we will need is something that needs to be assembled and made. You can get all of the parts from the same local hardware store where the inflatable pipe plug is!
We’ll want to be able to put air into the tank, but it is an absolute must that the amount of air is measured.
You can damage the tank if not done properly.
So we’ll need a short piece of 3/8″ fuel hose. Then we want to take a brass fitting with a 3/8″ hose barb on one side and then a threaded adapter on the other. This way we can adapt the hose barb to a tee-fitting where we can put a low pressure, pressure gauge on one end of the tee fitting.
Then an adapter that will go to a Schrader valve on the other end of it. This way we can put air through the Schrader valve and out the 3/8″ fuel hose on the other side! It will come out looking like this:
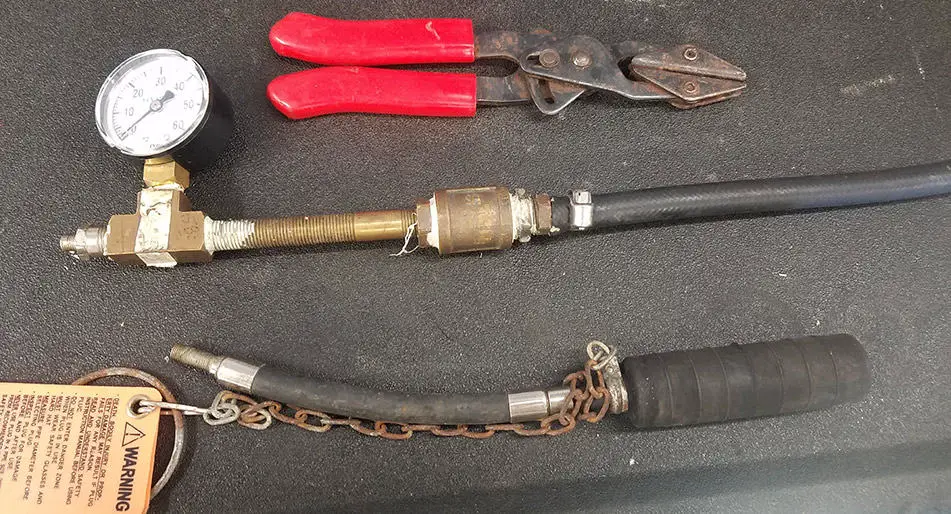
The last thing that we will need as an air pump, or a tank of compressed air. It doesn’t take a lot, but we will need some air and a nozzle to put the air into the tank.
Just like you do when filling your tires up with air, we will be putting some air into the tank through the Schrader valve on our tool that we just made!
Get Access To The Fuel Tank Components
Now that we have gathered all of the tools that we need, it’s time to get to the tank!
Sometimes this can get pretty tricky. Most boats have access ports that allow access to the two main portions of the fuel tank. We have the fill and vent part which is going to be located toward the front of the tank.
The other portion is the pick-up tubes and sender section that is located at the back or the aft of the tank.
There are some boat manufacturers that do not have access to these sections, but that is generally found on older boats that were made in the 90’s and sometimes older. After about the mid-2000’s all most, all manufacturers have access ports to these sections of the boat’s fuel tank.
The ones that don’t are because of the boat’s layout. The access is generally there; it is just under something like a leaning post with a livewell in it. Which means that the leaning post and the livewell have to be removed enough to get to the access port.
Then the last thing that we need to get to is the vent and the fill hose. Generally, there will be an access port on either the starboard or the port side of the gunwale where the fill port is located. (Just a side note, this explains the importance and Why Boats Use Port & Starboard Instead of Left & Right!)
Sometimes there is a cover that will have to be unscrewed to get to the hose’s, but there are usually only four or six screws holding it on!
Install The Inflatable Pipe Plug To Shut Off Fill Port
We’ll begin shutting off these ports with the fill. It’s a pretty simple process.
We just need to put our inflatable pipe plug down into the fuel fill hole and get the plug down into the hose where it isn’t against anything.
Just against the hose itself so that there are no spots where air can leak out of the hose.
Now just take the air pump or the tank of compressed air and very quickly fill up the plug until it is seated nicely in the hose.
They don’t take much air, so just a quick blast of air and the plug should completely close off the fill hose.
Close Off The Vent
Now we can move onto the vent, which is also extremely easy.
After we get that access off and get to the vent hose. Which it should be right next to the fill hose.
We can take our hose pinch pliers and simply pinch off the vent hose!
Make sure and squeeze the pliers tightly so that it completely compresses the vent hose and no air can leak out.
Depending on the age of the boat and the hose, you might have to be careful because if the hose is old enough and beginning to dry rot.
You can actually damage the hose, and it will split when the pliers are compressed onto the hose. If this happens and everything is good with the tank. You can just cut that section out of the vent hose and using two splice hose barbs.
Just insert a little section of hose to connect the vent hoses and take out that section that was messed up. It is just a vent hose for air pressure to be relieved from the tank when the fuel expands due to heat!
Removing The Fuel Delivery Hose From The Pick-Up
This can turn into a real nightmare if you don’t do one little thing to save yourself a headache and frustration!
Unless the fuel line coming from the pick-up tube on the aft of the tank has absolutely zero extra hose available. You want to take a utility knife with a brand new blade and just slice a 1/2″-1″ section of the fuel hose that is connected to the tube.
That will allow you to use a large screwdriver to then work the hose off of the pickup tube and save you tons of time and frustration! Over time with heat and the effects of gasoline, the fuel hose will shrink and stick onto the hose barb.
Making it a massive hassle to get to come off, if not virtually impossible. Which is something that I don’t think most people think of. Where we can make that slice and have the hose off in under a minute, then just cut the sliced portion off the hose!
We lose maybe 3/4″ of hose but made the job 100 times easier and quicker! Also, the pick-ups, especially the really old ones, become extremely brittle and can snap off, turning the test into an issue!
Once the hose is off though, we just want to stick on our pressure testing tool that we made and put a hose clamp on the end of it. Tightening it onto the hose barb. Now we are ready to start testing!
Pumping Air Into A Fuel Tank
After a lot of tool collection, creation, and set up. It’s time to actually put some air into the tank and see what happens!
Before pumping, though, it’s crucial to understand how much air is ok, and how much air is absolutely not ok!
If too much air is pumped into a fuel tank, it can split the welds and destroy the tank. Surprisingly, it doesn’t take that much to do it either.
The maximum amount of air that you ever want to put into a fuel tank is three psi! Never any more than that.
I like to stay around 2-3 psi, mainly right at about 2 1/2 psi. If there is a hole in the tank or a split somewhere, 2 1/2 psi is enough to push fuel out of that hole and show signs of the hole.
So, with everything set up, we just want to put our air pump or tank of compressed air to the Schrader valve on the pressure gauge and begin filling the tank.
Depending on how much fuel is in the tank, will determine how much air is needed to pressurize the tank. Just apply the air in quick blasts, watching the air pressure gauge to see where the pressure is at.
Slowly work your way up to two and then hold off at two, to see if the tank begins to lose pressure or not.
Locating A Leak, If There Is A Leak!
If after a few minutes or even seconds, you see the gauge going down. We need to locate the leak, if possible.
We’ll start by taking some soapy water and spraying it around the pick-ups and the fuel sender. Most of the time, if there is a leak in the tank and it isn’t the tank. It is the fuel sender or the fittings at the pick-up tubes.
Coat the fittings and sender with the soapy water and look for air bubbles. If we don’t see any air bubbles, go through the tools that we are using to ensure that we have the vent, and the fill hose plugged off properly.
Then, also make sure that our pressure testing tool doesn’t have any leaks around the tee-fitting, the gauge, or the Schrader valve.
Continue pumping the tank back up to two psi and spraying the soapy water around the fittings and tools until we are 100% sure that the leak is not coming from anything on the top of the tank.
We’ll want to keep an eye on the bilge as well, making sure we don’t see fuel coming out into the bilge. If we do see fuel filling the bilge. The boat’s fuel tank has failed, and it is time to replace the tank!
Check Us Out!
If you’ve got any questions or comments, let us know by subscribing to our YouTube Channel!
And if you would like to support us to continue bringing you great content, please click the link below to Amazon where we get a commission from anything you are already going to buy!
Click Here To Amazon!
And you can also donate by clicking the donate button here or on the right hand of the screen!
It really helps us out and we thank you so much for your support!
Thanks for reading and we look forward to reading your responses and comments.
Hopefully, this has been helpful, and now you know how to pressure test a boat’s fuel tank! Here is something else that you might find helpful and exciting! We have an excellent article about whether or not It Is Ok To Use Ethanol Gas In A Boat & What You Need To Know If You Do!
As well as what you should know about The Effects Of Saltwater Vs. Freshwater On A Boat! Or Whether A Boat Is A Good Or Bad Investment!
We’d like to invite you to check us out on our Youtube Channel @ Born Again Boating. Where we make all kinds of how-to and DIY videos for all of your outboard service and projects! Get subscribed to the channel and add us to your favorites!
So that we can become your go-to resource when it comes to all of your boating projects! Let us know about any questions you have in the comment section below! Thank you for reading :)