Boat batteries can be expensive, knowing how to properly care for them and extend their life can save you a lot of frustration and money! Here’s exactly how…
How Long Do Boat Batteries Last? Most marine batteries last anywhere from 2 to 5 years depending on the level of care you give them. Most batteries come with a one year warranty, but more expensive batteries might come with up to three years of warranty.
This article will teach you how to properly care for marine batteries and how you can make your boat’s battery life last as long as possible!
Why Do Boat Batteries Go Dead?
The single most overlooked factor in keeping your boat’s batteries healthy, running properly, delivering the correct output and living as long as possible is cleanliness.
Did you know: Dirt, dust, salt or any other type of debris. Sitting on top of your battery can cause the battery to drain itself?
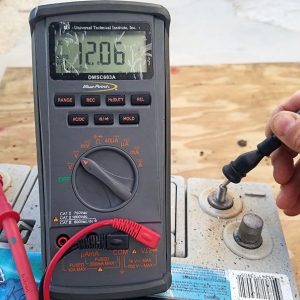
It’s true! We can take a battery voltage meter to the battery terminal and notice it reads 12 volts. Then, if we put the red meter lead in the middle of the battery.
(Where there was debris present) the meter will indicate a loss!
You can lose a lot of voltage just across the dirt on the battery. It isn’t just that particular tested spot either. When we checked all over the battery, the constant drain remained.
As batteries age, there are several components that wear out and ultimately get worse. (Even when you clean the top of the battery).
However, by keeping the top of the battery clean, we can ensure there is no wasted drainage. This tip can be implemented immediately. Make sure those battery tops are squeaky clean!
Understanding Boat Batteries
Although we won’t go into the specifics of batteries (AGM’s, flooded, etc).
It is mainly important to know whether your marine battery requires maintenance or is maintenance-free.
Maintenance batteries can be identified by the accessible ports on the top of them.
This is where you can add distilled water to the battery.
Note: you NEVER want to add battery acid to these types of batteries, just distilled water.
Once you pop the top off. You can see whether the battery water level is low or not. You want to maintain the water level up to about a ¼” from the top of the battery.
So that the cap terminals can still stick down into the water level opening. Be sure to use goggles and gloves for safety purposes! Whenever you are filling a battery.
With maintenance-free batteries, on the other hand, none of this is required. Instead, what we have to do is make sure the batteries remain charged up at all times.
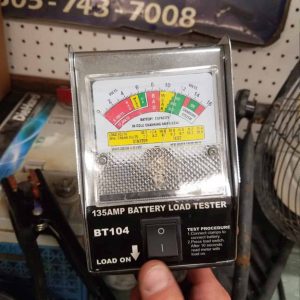
The best way to check the charge of your battery is by using a load tester. You can pick up a standard analog load tester at your local auto parts store.
Or you can use this link here for our recommendation of a load tester from Amazon!
What this analog load tester does is put a huge amp draw on the battery. It does this to verify if the battery holds up while under that load or not.
We are looking to make sure that the battery voltage does not drop to less than 10 volts.
9.5 volts is the lowest that most outboards will be able to start with. If it takes to long to turn over, they won’t start with much less than that.
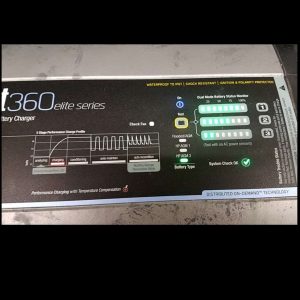
There are more expensive ways of checking a battery though. By using more advanced testers. Although not required, these devices display interesting additional info such as cranking amperage percentages.
This shows you the ability of the battery. How much life it has left and whether you need to charge, retest or replace the battery.
How Often Should You Charge A Boat Battery?
If you want your boat batteries to last longer. Then they will need to get charged! The most common question we receive from clients is “Should I leave my boat battery charger on all the time?”
Our answer is typically a yes and no. Let me explain…
There are many different types of chargers ranging from onboard boat chargers to plain battery chargers. The main thing to remember with any setup is the amperage that we are putting into the battery.
And for how long?
A lot of batteries fail because they’ve been overcharged. This happens when the chargers essentially “cook” the battery until it no longer holds a charge.
This is most common in boats with onboard battery chargers. Although it can also happen if the engine’s charging system fails as well.
If you are going to leave a charger hooked up to a battery for an extended period of time. It is important to use a “trickle charger” or a really low amp charger such as a 2-amp charger.
This will prevent it from cooking the battery. If you leave your battery with a 10, 12, or 15 amp charger. You risk cooking it and causing it to fail a lot sooner than it should.
Additionally, you never want to leave your battery charger hooked up to the batteries and on at all times. The best practice is to use the charger for a day or two. And then leave it unhooked for a week or two.
“Cycling” charges like this can significantly extend the life of your battery and prevent overcharge.
Although most new chargers have sensors built into them that are designed to prevent overcharging once full. These sensors commonly fail after the charger is a few years old so don’t rely too heavily on this.
How Long Does A Marine Battery Hold Charge?
How often do you use your boat? If you are regularly using your boat, the engines will be charging the batteries and there isn’t such a big need to use a battery charger.
Most engine gauges indicate the voltage output of your battery and whether it is charging or not.
You can also check to see if the engine is charging the battery by putting your meter on it while the engine runs.
If you don’t have a voltage meter, you can get one from Amazon from here!
When you do check, you should see somewhere around 14 volts with the engine running. (Sometimes slightly more or less depending on engine RPM’s as well as the age of the engine).
If you advance the throttle just a bit, you should see the voltage steadily climb a little bit towards 14 volts.
To learn all about Outboard Alternators & Outboard Charging Systems, read that article that we wrote about them.
What you DON’T want to see is 15 or 12 volts. This means your engine is either overcharging or not charging at all!
Either of these cases will wear out the battery and shorten its lifespan.
Marine Battery Life
By now we’ve covered cleanliness and other battery information. But it’s also important to break down critical information regarding battery terminals.
When it comes to battery terminals, loose or dirty connections can wear out your battery! Along with parts of the engine starting system due to it not receiving the right amount of amperage.
Think of this scenario like breathing through a straw. Yes, you can do it (for a short period of time that is). But if you do it for too long (and with a small enough straw).
You will eventually pass out! With your engine parts, on the other hand, they will eventually just die out, costing you lots of money.
This is why we recommend using something like a CRC battery terminal protectant to help keep the connections free from dirt and corrosion.
Changing and Maintaining A Boat Battery
A quick tip on changing your boat’s batteries. Whenever you change them, we recommend that you pair all of battery terminal connections with a zip tie.
This way, a ground wire doesn’t get forgotten whenever we put the connections onto the new battery. This will also prevent you from hooking up the terminals backward which can result in serious engine damage!
A lot of clients ask us about colder climates and how it relates to batteries. If you live in a colder climate and have to “winterize” your boat.
You most likely take your batteries out of the boat and store them inside a garage or someplace fairly warm for the season. This is great as it will definitely help extend the life of your batteries.
If you want to take it a step further. The proper thing to do is to hook your batteries up to a “trickle charger.” And keep them out of the cold weather. Once the warm season comes along, you can put them back into the boat.
If you zip-tied all of your wires together as we recommend, the process should be faster and smoother.
For even more information read our in-depth breakdown article about Boat Batteries Freezing & Even Getting Wet.
Fixing A Draining Boat Battery
It happens…
Having a constant drain on a battery of any kind is obviously not a good thing. Fortunately, there are several ways for us to determine if there is a drain on our battery and what is causing it.
Note: You want to be careful in doing this test. Because it can damage your meter if too much amperage is sent through it while performing the following test.
In order to identify what is called a “parasitic draw” on your battery. We first want to switch off the battery and make sure the boat’s key switch is off as well.
Next, disconnect the ground cable from the battery. With the meter set to amps. We will put the positive (+) meter to the ground cable and the negative (-) meter lead to the battery.
This will show us how much amperage is currently being drawn out of the battery.
It is not uncommon to see a few millivolts, however, we don’t want to see anything more than that. If there happens to be a consistent draw showing up on the meter.
We will have to go through the breakers or fuses that feed all of the boat’s components and do some testing.
You will need to pull each fuse out one by one until we see the draw go away.
At this point, we can troubleshoot that specific item in order to stop the parasitic draw from draining out the battery.
Knowing how to operate the battery switch is another technique that can help you prolong your batteries life.
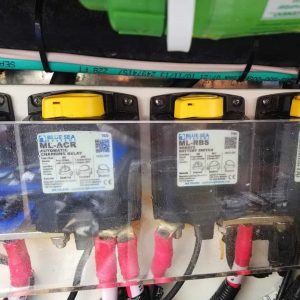
As it gives you complete control of the charging voltage coming from the engine. A lot of new boats have what are called “charging relays” or “ACR’s. These are also referred to as “voltage sensing relays” or VSR’s.
These are isolators that automatically sense which batteries need to be charged and which ones don’t. These sensors automatically combine the batteries when charging and then disconnect them when there is a draw on the batteries.
We can do the same thing by simply using the battery switch. If there is more than one battery in the boat. (We recommend two batteries for any boat bigger than 16 feet with electronics.)
Read this article here if you are unsure about How Many Batteries Should Your Boat Have?
The battery switch will be a 4 position or a combining battery switch. What you do is the following:
Whenever you first start the boat, you can start it using either battery or both. You can even start it twice, checking both batteries one at a time. To make sure they can start the boat individually.
Once the engine is running. Simply turn the switch to the “both” or combined position while being careful not to turn it to the off position while the engine is running.
What this will do is allow the engine to charge both batteries at the same time. While you are running so then when you arrive at your destination. You can turn the engine off and return the battery switch to either one or two.
This way, when you are ready to go and have had your radio, bottom fish finder, live well pumps and washdown pumps draining that battery for the entire time your engine wasn’t running.
You can switch over to the second battery and start the engine!
Then, put it to the combined position again before taking off in order to charge up that drained battery while you’re running back home!
This will help prolong the life of the batteries by maintaining them properly and keeping you from being stranded with a dead battery!
For more information check out our video on this subject!
Check Us Out!
Now that you know how to make your boat batteries last longer. You should check out these other helpful articles packed full of information to help you with your boat!
How To Get More Hours Out Of Your Outboard With Less Break Downs!
Does YOUR Boat Have The Right Propeller? & How To Check!
If you’ve got any questions or comments, let us know by subscribing to our YouTube Channel!
And if you would like to support us to continue bringing you great content, please click the link below to Amazon where we get a commission from anything you are already going to buy!
Click Here To Amazon!
And you can also donate by clicking the donate button here or on the right hand of the screen!
It really helps us out and we thank you so much for your support!
Thanks for reading and we look forward to reading your responses and comments.
We’d also like to invite you to check out Our YouTube Channel! Where we create all kinds of How-To and DIY boating videos. To help you learn more and more about your boat and how it works!