 No one wants to be stuck on the side of the road. In addition, no one likes to have to change a tire on the side of the road in the rain! Isn’t there a way to avoid being stuck on the side of the road with a blowout?
How To Perform Seasonal Trailer Maintenance: Maintaining and inspecting your trailer lights, wheels, rims, hubs, axles, brakes, and springs will help prevent accidents and blowouts. Schedule a regular inspection routine to keep yourself on top of avoiding a roadside issue.
This article will help you schedule, perform, and learn about everything that will help to prevent you from being stuck on the side of the road with your trailer!
Trailer Maintenance Inspection Items or PMI
Your first line of defense against being stuck on the side of the road with a blowout is a regular trailer maintenance schedule. This will ensure the longevity of your trailer and also enable you to tow the boat to your destination safely.
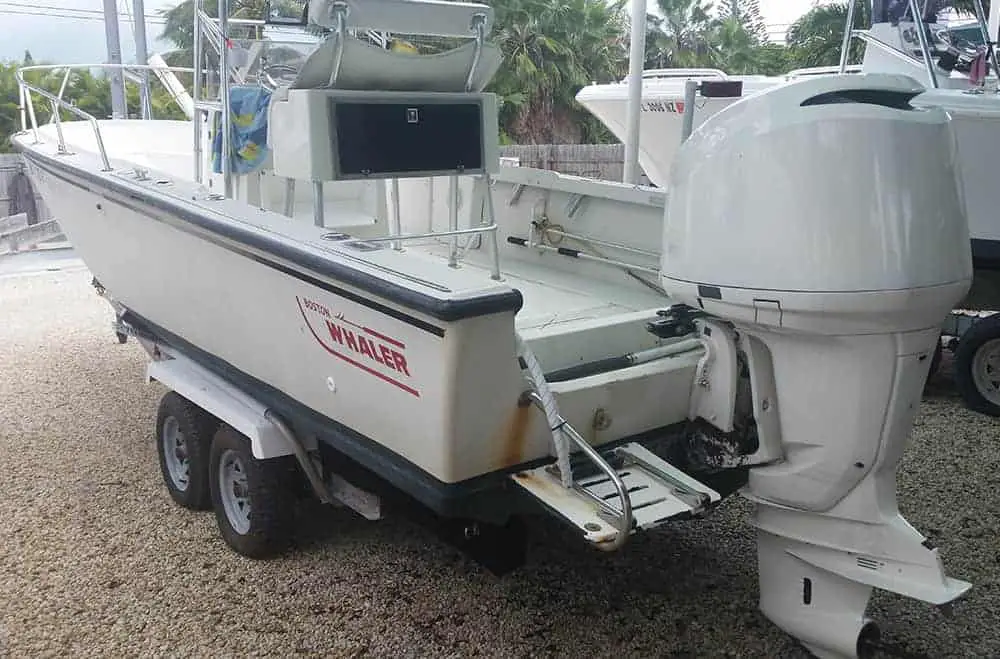
Nothing can put a wrench in the works of your boating plans like a broken down trailer. If you do not wish to deal with the hassles of a broken trailer when you could be enjoying your time out on the water. Make sure to properly inspect and service your trailer before you take it down the road.
Worn or broken down trailer parts not only disrupt your plans, they can also cause you to lose control on the road, resulting in damages, injury, or even death.
You want to maintain your trailer regularly to ensure safe operation. If your trailer has an accident or gets on the receiving end of a powerful impact, it might be a good idea to have it professionally inspected.
Otherwise, it is perfectly okay to do the maintenance yourself. Just make sure that you cover every inch of your trailer with regular maintenance. You should pay attention to all of the following parts.
Wheels:
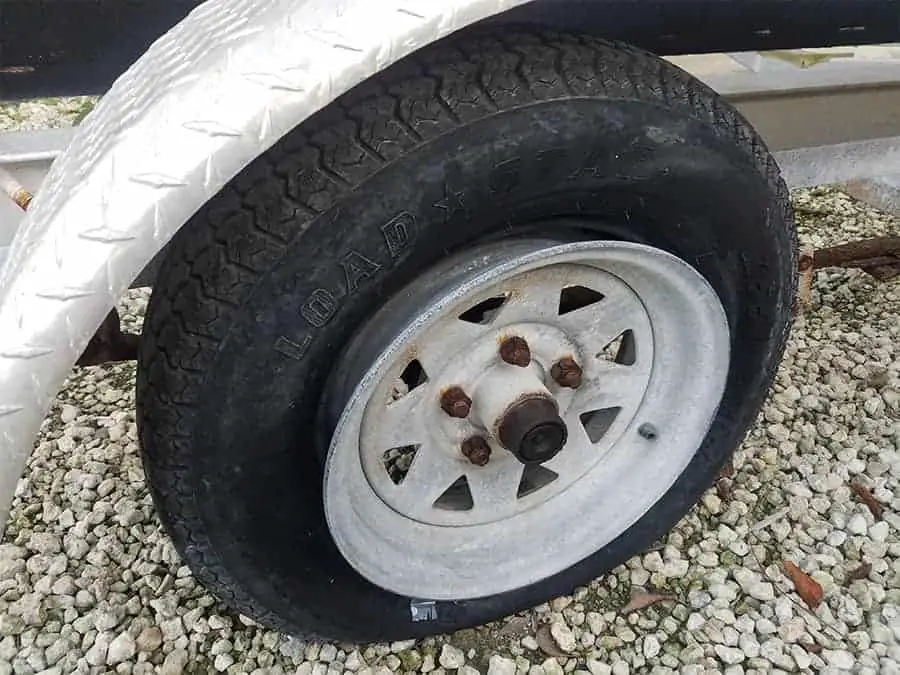 You should periodically check your wheels’ lug nuts for tightness. If you take your trailer out every day, it won’t hurt to give them a look once a month or so.
You might find the lug nuts to be loose, tighten them up to prevent any mishaps on the road. If you just changed out a rim and tire or put all brand new ones on.
It’s a great idea to just give them a check after your first trip to be sure everything is ok.
Another thing is to give your whole trailer a thorough inspection after it takes any impact. Even bumping a curb can cause damage to your trailer.
If this happens to you, check the wheels’ tightness immediately. Additionally, check the wheel rims for bends and damage. A damaged wheel will need immediate replacing.
Tires:
 Apart from the wheels, you should check the tire pressure to ensure safe and reliable operation of the trailer on the road. Make sure that the tire pressure matches up with the level indicated on the what is stated on the sidewall.
You should check the tire pressure once or twice a month, depending on how often you use the trailer. Or after the trailer has been sitting for more than a month or so.
Make sure that you do this when the tire is cold too. You don’t want to check the tire pressure immediately after you tow your trailer. Let the tires cool down if you have towed the trailer for more than a few miles or so before checking the pressure.
Apart from tire pressure, regularly inspect the tire sidewalls for bubbles, bulges, cuts, or objects stuck in the grooves. If the tire requires repairing or replacement, do this before towing your trailer.
Also look at the tire tread to check its condition. If the tread depth is less than 1/16th of an inch, it is time to get some new tires.
Then you also want to be conscious of the valve stems on the tires. These are another place of failure. That can cause a leak after dry rotting around the bottom.
The last thing you need is a bald spot on the tire blowing out while you are on the highway!
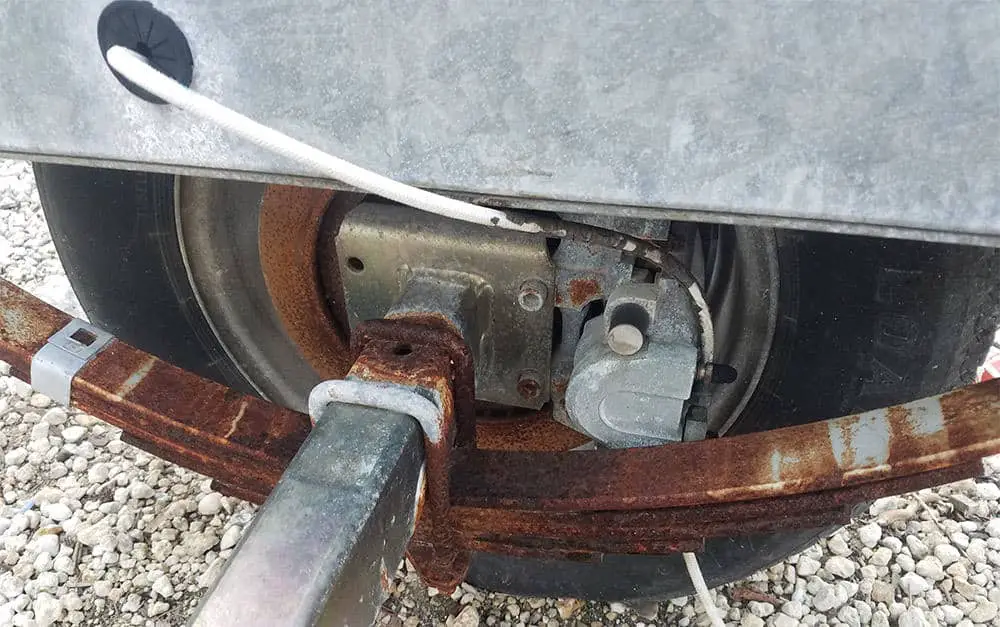
Brakes:
It is a good idea to have the brakes inspected professionally at least once every year, or after every 12,000 miles, whichever comes first.
If you are used to running your trailer with brakes. Then having a failure happen with them will drastically change the way your vehicle preforms when pulling your boat.
 Trailer brakes help to save your vehicles brakes. As well as the wear and tear of other parts on your towing vehicle. Usually a truck or SUV, but sometimes a car!
To perform brake maintenance, you should adjust the brake shoes after the first 200 miles, and then after every 3,000 miles. You should consult your trailer’s axle and brake manual for information on how to adjust your brakes manually.
However, many axles have a break mechanism that automatically adjusts the brake shoes when you hard brake the trailer from a rearward direction.
You should also inspect your brake shoe lining regularly. To do this, remove the hub from the body of your trailer. Use a brake cleaner or contact cleaner to clean the brake assembly, and then allow it to dry.
After cleaning the assembly, inspect the trailing and leading brake shoes for wear. Hairline heat cracks occur with everyday use and are nothing to be worried about. However, if the lining wears out, it might be time to change the brake shoes.
You don’t want to have metal on metal contact, which will destroy the discs. And you will end up having to replace them as well!
You will also need to replace the shoes if the lining has corroded, or taken damage.
If you replace the brake shoe on one wheel, you must also do so on the opposite wheel to ensure uniform braking power. You should also replace the retracting hold-down springs every time you replace the brake shoes.
If your trailer has electric brakes, you may have to tweak them occasionally to keep them synchronized. You can do this by making hard stops on dry pavement and tweaking the gain settings on the tow vehicle controller.
If the brakes skid or are too sensitive when you brake on the dry pavement, decrease the gain until they do not skid.
Additionally, make sure that the breakaway brake battery has enough charge to provide sufficient braking power.
You may also need to test the breakaway system. To do this, unhitch the trailer from your vehicle and pull the pin out of your breakaway switch. Then, try to tow the trailer.
If the wheels lock up and the trailer does not roll freely, your breakaway mechanism is working properly. You can reinsert the pin and hitch the trailer to your vehicle.
However, if the wheels do not lock up, you will have to get the breakaway system professionally inspected or have an understanding of the system. In order to fix it.
Axles:
You should always check the axles and make sure that the trailer alignment is correct before taking your trailer out.
Additionally, check the axle welds and joints for cracks and damage. Pay special attention to the spindle at the point where it connects with the axle tube and look for any damage that might exist.
 Bent or damaged axles and spindles can cause your tires to wear out prematurely and increase the potential of you losing control of your trailer on the road.
You also want to inspect the ends of the axles where the hubs attach the wheels to the axles. This is a location of high stress and normal failure.
These spots on the axles are usually the first to rust out and fail.
Lights:
Always make sure that your trailer’s lights are in working condition before you take it out. Properly working lights are essential for maintaining road safety.
If the lights do not work and you are lucky, you can get by with warning instead of a ticket from a police officer.
However, serious accidents resulting in injury or loss of life are all possible outcomes of not having working trailer lights.
For this reason, always ensure that your trailer lights work before you take it out on the road.
Because trailer lights are known for working today, and not coming on tomorrow.
The most common cause of this is because of the ground cable attaching to the trailer. They will make the lights flicker on bumps and is the one thing that all the lights use in common.
Hubs:
The wheel hubs connect your tires to the axle and allow them to spin. Before you take your trailer out on the road, ensure the hubs do not have any damage to avoid impaired steering. In the worst-case scenario, this can lead to a broken axle.
You should inspect your wheel hubs after every 2,000 miles of use.
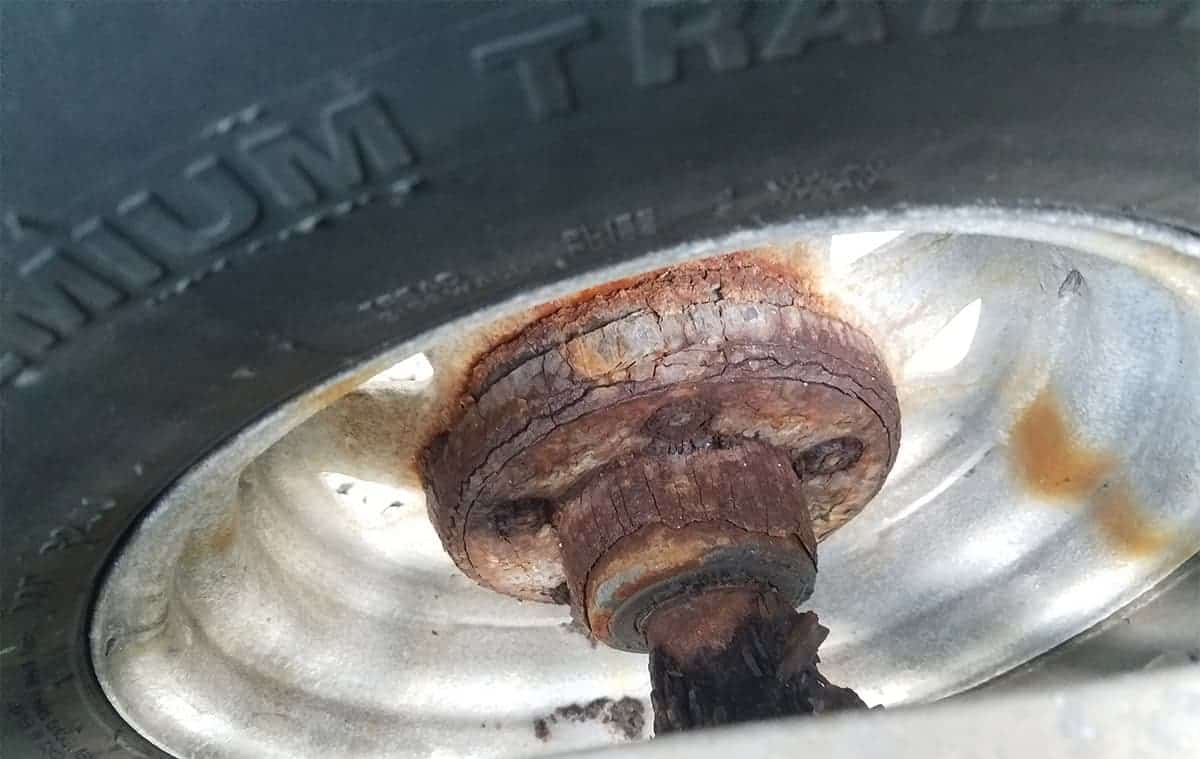 It is also a good idea to check your wheel bearings often and ensure they are in proper working condition. These remain hidden from view behind the wheels and you will have to remove the wheels to access them from the front.
Jack your trailer up and try to shake the wheels with your hands. If it rattles or feels loose, you should tighten all the nuts in your axle.
However, if that does not work, low grease in your bearing is the most likely culprit. We will discuss more about greasing the bearings at the end of this article.
For a quick inspection, just push on the tops of the tires to see if there is any rocking back n forth. If there is, you have some play and an upcoming issue.
The backs of the hubs can be see from inside and will allow you to get a quick visual inspection in. Just to save on time when you are keeping up with you inspections.
When to Schedule These Inspections
We have already discussed when you should inspect the individual elements that make up your trailer. Just make sure that you follow this schedule regularly.
The best way to do this, depending on how often you use your trailer. Is to pick an apporpriate day that fits your schedule. And put a reminder in your phone on the calendar.
That way, three or four times a year, your phone will automitacally remind you to inspect your trailer on. “Saturday” or whatever day you pick!
However, it might be a good idea to give your trailer a quick overview to ensure everything is tip-top every time you take your trailer out on the road too.
Always remember – dealing with any damages or repairs is much more convenient in your garage than it is on the side of the road on a blistering summer afternoon. Or a cold windy morning in the fall!
When Is It Time To Replace Items?
If the parts of your trailer are out of shape, or develop cracks and pits, it is time to replace them to ensure the safe operability of your trailer.
 For tires, if the treads wear out, and the tread depth is less than 1/16th of an inch, you should invest in a new pair of tires. It is a good idea to replace all the tires of your trailer at the same time to ensure uniform road grip on all sides.
This goes for the brakes, axles, and hubs as well. If they are beginning to rust all the way around. It’s time to change them out.
Over time the lights will begin to fail and the wiring will get brittle and start to crack. If you notice that this is happening. It’s time to take an afternoon and change out the lights.
You can get lights super cheap on Amazon and just replace the lights and the wiring for $20-40! For the headache of messing with them later, or a ticket.
It’s well worth the afternoon and the money!
Trailer Maintenance: When to Perform Greasing & Oiling
Greasing and oiling is a regular part of the maintenance of your trailer. Different manufacturers recommend different schedules for greasing your trailer.
To be on the safe side, you should perform greasing after every 2,000 miles or when your bearings run out of grease (which we discussed earlier in this article).
Hopefully you have buddy bearings and you can just give them a couple pumps every few months or so!
If you are going to store your trailer for a long time, it might be a good idea to perform greasing to ensure that the trailer works properly the next time you need to use it.
You don’t want to let the bearings sit with water in them and low on grease. This will rust out the bearing and cause it to fail pretty quickly once you get the trailer out and start using it regularly again!
How to Grease the Bearings & What to Oil
To grease the bearings, you will have to first jack up your trailer. Once you secure it properly on the jack stands, you can remove the lug nuts, tire, and the dust cap. Then, remove the cotter pin and the castle nut and washer.
This will give you access to the outer bearing. Remove the bearing cone, and then the hub from the spindle. This will reveal the inner wheel bearing.
You can take out the bearing seal from the back of the hub. This process usually destroys the seals, so make sure you have replacements for putting the bearing back together. Once the seal is out, you can remove the bearing.
Remove the inner and outer bearing cages from their races and clean them up with a clean rag. Use a degreaser to wash the bearing caps and then allow them to dry. If there is any pitting or corrosion on the bearing, you will have to replace it entirely.
Otherwise, you can grease the race and repack the bearing with ample grease. After repacking, clean the spindle again with a solvent and a rag. Then, grease the spindle and put the whole contraption back together.
If you follow all the steps carefully, you will have a properly greased bearing that prevents your wheels from rattling.
Another way to do this. Is to invest in some buddy bearings where you can just use a grease gun and pump grease into the bearings without having to pull them out and pack them!
Check Us Out!
Now that you know exactly how many batteries you should have in your boat, you should check out some of our other articles. Here are some that you will find extremely helpful and informational!
How Long Do Boat Batteries Last? In addition, How to Make Them Last Longer!
How to Get More Hours Out Of Your Outboard with Less Break Downs!
We would also like to invite you to check out Our YouTube Channel! We create all kinds of How-To and DIY videos to help you learn more and more about your boat and how it works!